


Security of communication and data is increasingly important. After all, you don't want malicious parties to be able to view the communication between visitors and your website(s). That is why it is extremely important to encrypt sensitive information such as customer data and payment data via 'https' traffic. In order to achieve this, you will need to install an SSL certificate on your VPS.
This manual covers the following topics:
- Installing an (Sectigo) SSL certificate in Apache
- Installing a Let's Encrypt SSL certificate in Apache (Ubuntu)
- Installing a Let's Encrypt SSL certificate in Apache (CentOS 7)
Perform the steps in this article as a root user or user with sudo rights unless otherwise specified.
Requirements:
- An (Sectigo) SSL certificate (when not using Let's Encrypt).
- It is very important that you saved the (correct) passphrase for the (Sectigo) SSL certificate because, without it, you cannot decrypt the 'private key'. If you do not have the passphrase, you will first have to request a reissue of your certificate.
- A working installation of Apache (and an FTP server such as vsFTPd or ProFTPd).
- This manual assumes that you have already uploaded a working website that can also be accessed via normal http.
- This website must have a correct VHOST in which the 'ServerName' also refers to your domain (required for Let's Encrypt).
- If you use a CAA record in your DNS settings, make sure that you have included "Comodo" (for Sectigo certificates) or "Lets Encrypt" in such a record.
Installing an (Sectigo) SSL certificate in Apache
First, it is important that you upload the files from the SSL certificate download to the VPS. For this manual we've used FTP, but of course you can also place the SSL certificates on the server via SCP or another method.
Step 1
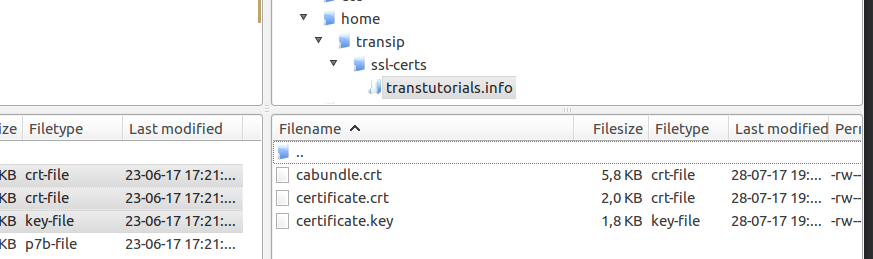
Create a folder for the SSL certificates in the /home directory in your OS. An alternative location could be /etc/apache2/ssl/. By default, there is a folder for storing SSL certificates (Debian / Ubuntu: /etc/ssl/certs | CentOS: /etc/pki/tls/certs), but the root is the owner of this. Therefore, you will not just be able to upload certificates to it via any FTP user.
Step 2
Upload the three relevant files to the folder for the SSL certificates. It concerns certificate.key, certificate.crt and cabundle.crt.
Step 3
Now you adjust the 'virtual host' for your domain, to ensure that it is accessible via port 443 (https) and so you can indicate where the SSL certificate can be found on the server. By default, you will find the VHOST in /etc/httpd/sites-available/yourwbsite.com or /etc/apache2/sites-available/yourdomain.com (replace 'yourdomain.com' with your own domain). You can check this folder's content using the command:
ls /etc/httpd/sites-available/
ls /etc/apache2/sites-available/
If your domain is not yet listed here, then execute the following command:
a2ensite yourdomain.com
Step 4
Open the .conf file for your domain with your favourite text editor such as vim or nano:
nano /etc/httpd/sites-available/yourdomain.com.conf
Step 5
You now see the (http) configuration of the virtual host for your domain. This is displayed between the
<VirtualHost *:80>
and
</VirtualHost>
-tags. Here, several configuration parameters are included but mainly consist of comments or explanations about the options. Add a new VHOST for https under the closing </ virtualhost> tag, as shown below:
<virtualhost *:443>
DocumentRoot /var/www/html
SSLEngine on
SSLCertificateFile /home/transip/ssl-certs/yourdomain.com/certificate.crt
SSLCertificateKeyFile /home/transip/ssl-certs/jedomein.nl/certificate.key
SSLCertificateChainFile /home/transip/ssl-certs/jedomein.nl/cabundle.crt
</virtualhost>- <virtualhost*:443>: This indicates that the virtual host applies to all incoming connections (by use of the wildcard *) to port 443. If you want to make the domain accessible through a specific IP only, you change this to <IPADRES>*443.
- DocumentRoot: This is the location on the server where the files of your website are located. In the example, this is /var/www/html, but this can differ from your situation.
- SSLEngine on: Enables SSL for your domain.
- SSLCertificateFile: This is the location on the server where the SSL certificate can be found. You have chosen the location in step 2 and, therefore, enter this location behind this option.
- SSLCertificateKeyFile: This is the location on the server where the private key of the SSL certificate can be found. You have chosen the location in step 2 and, therefore, enter this location behind this option.
- SSLCertificateChainFile: This is the location on the server where the 'Certificate Authority' bundle can be found. You have chosen the location in step 2 and, therefore, enter this location behind this option.
Step 6
Save the changes and exit (using CTRL + X > Y > Enter in Nano).
Step 7
Test whether everything is configured correctly by executing the following command:
apachectl configtestIf you then get an error message with the content "Invalid command 'SSLEngine', perhaps misspelled or defined by a module not included in the server configuration", then 'mod_ssl' is not yet enabled for Apache. Execute the following command:
a2enmod ssl
systemctl restart apache2
If you get the message "Syntax OK", everything is set correctly, and you only need to restart Apache.
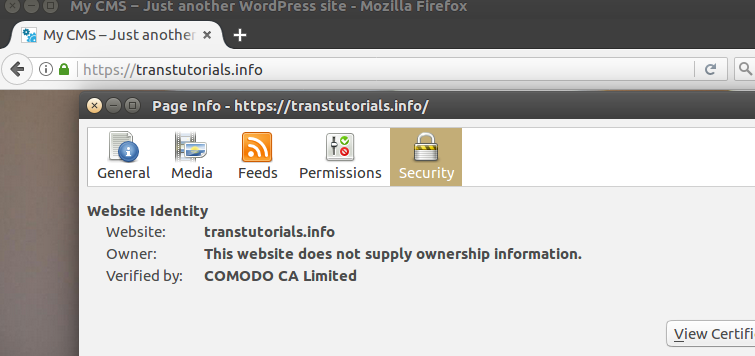
systemctl restart apache2The SSL certificate is now successfully installed! If you go to https://yourdomain.com, you will see that your website is fully secured via https!
If you want to ensure that all visitors are send to 'https://yourdomain.com' by default, then you can change the virtual host for http (i.e. the virtualhost *:80 part) to:
<VirtualHost *:80>
ServerName jouwwebsite.nl
Redirect permanent / https://jouwwebsite.nl/
</VirtualHost>
Installing a Let's Encrypt SSL Certificate in Apache (Ubuntu)
Step 1
Install 'Let's Encrypt' on Ubuntu by executing the following:
apt -y install certbot python3-certbot-apache
Step 2
Ensure that a VHOST is configured for your domain before you begin this step.
Now create an SSL certificate using the following command (replace jedomein.nl with your own domain name).
certbot --apache -d jedomein.nl
Step 3
Follow the indicated steps. It may happen that Let's Encrypt automatically forces the use of a different vHost than the one in which your site is configured (you will see this in the output from Step 2). If that happens, disable the default configuration, re-enable your vHost (replace jedomein.nl.conf with the correct file), and reload Apache:
a2dissite 000-default-le-ssl.conf default-ssl.conf
a2ensite jedomein.nl.conf
systemctl reload apache2
Let's Encrypt automatically renews your SSL certificate periodically. No further action is required.
Installing a Let's Encrypt SSL Certificate in Apache (CentOS Stream/AlmaLinux/Rocky Linux)
Step 1
Install the EPEL (Extra Packages for Enterprise Linux) package to add extra packages required for the installation of Let's Encrypt:
dnf -y install epel-release
Step 2
Now install 'Let's Encrypt' and mod_ssl (if the latter is not already active):
dnf -y install certbot python3-certbot-apache
Step 3
Ensure that a VHOST is configured for your domain before you begin this step.
Now create an SSL certificate using the following command (replace jedomein.nl with your own domain name):
certbot --apache -d jedomein.nl
Step 4
Follow the indicated steps and reload Apache:
systemctl reload httpdLet's Encrypt automatically renews your SSL certificate periodically. No further action is required.
This brings us to the end of our guide on using SSL in Apache.