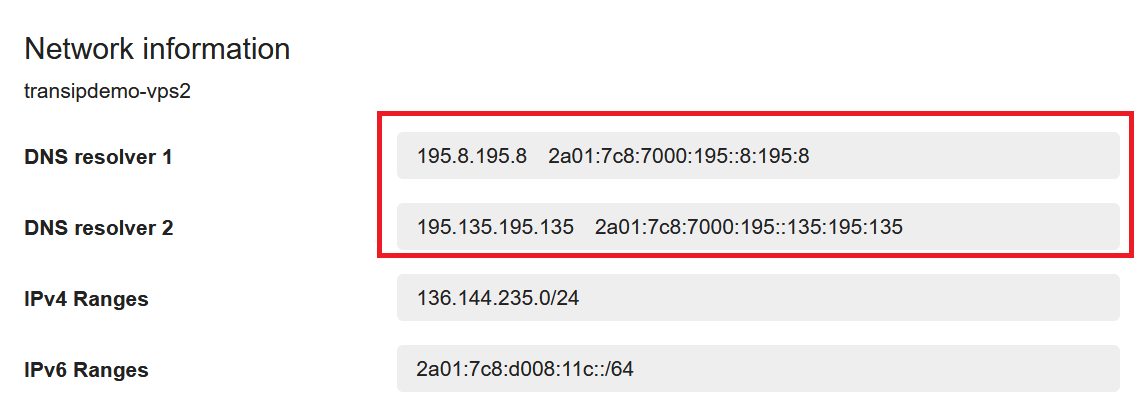
In dit tutorial we show you how to change the DNS resolvers of your VPS. The current IP addresses of TransIP's DNS resolvers required for the steps in this tutorial, can be found in the TransIP control panel under 'Manage' > 'Network Information'.
What are DNS resolvers?
When your server or computer tries to connect to a domain name, it connects to a DNS resolver. A DNS resolver, also known as Domain Name resolver, is a server that can use various querries to find out which IP address belongs to a domain name.
DNS resolvers, for example, ensure that when you navigate to www.google.com in a browser, www.google.com is translated to an IP address. Your browser will then ask the server associated with this IP address for the content of the web page for www.google.com and display it in your browser. It is therefore important that a domain's DNS settings point to the correct IP address.
DNS resolvers are automatically set on your server during DHCP network configuration. When using a static network configuration, your DNS resolvers may also be set statically. This can lead to problems in certain situations.
For example, suppose the IP addresses of your provider's DNS resolvers change and the old DNS resolvers go offline. In that case, your VPS can no longer convert domain names and translate them to IP addresses. Most of the network functionality of your VPS will no longer work at that point.
Changing DNS resolvers in Linux
- Follow the steps below using sudo, or as a user with root permissions.
- Docker containers require a restart for the changes to take effect.
InsStep 1
Connect to your VPS using SSH or the VPS-console in the TransIP controlepanel.
Step 2 - optional
The current DNS resolvers can be checked with the command:
cat /etc/resolv.confThe output will look similar to the code below:
# Generated by NetworkManager
search transipdemo.nl
nameserver 195.8.195.8
nameserver 2a01:7c8:7000:195:0:8:195:8
nameserver 2a01:7c8:7000:195:0:135:195:135
The values which are listed here are generated automatically based on your network configuration.
To gain more clarity on which of your domains use our old nameservers, you can use the following command (replace ens3 with the name of your network interface):
sudo tcpdump -i ens3 host 80.69.67.66 or 80.69.66.67
Step 3
Open your VPS' netwerk configuration.
The example below is from CentOS 7. Please note that the location of your network configuration file can be different based on your operating system. For the most commonly used operating systems you can check the file location in our tutorials for setting a static IP configuration.
nano /etc/sysconfig/network-scripts/ifcfg-eth0
Step 4
The content of this file may look like the example below, where the value behind DNS1, DNS2 and DNS3 are the IP addresses belonging to the DNS resolvers:
DEVICE="eth0"
NM_CONTROLLED="yes"
ONBOOT=yes
TYPE="Ethernet"
UUID="eca20a47-a714-40d4-9422-86ed07b860d1"
HWADDR=12:34:00:35:1f:27
DEFROUTE=yes
PEERDNS=yes
PEERROUTES=yes
IPV4_FAILURE_FATAL=yes
NAME="System eth0"
BOOTPROTO=static
DNS1=2a01:7c8:7000:195::8:195:8
DNS2=2a01:7c8:7000:195::135:195:135
DNS3=195.8.195.8
IPADDR=123.123.123.123
GATEWAY=123.123.123.1
NETMASK=255.255.255.0
IPV6INIT=yes
IPV6ADDR=2a01:7c8:aabb:11::1/48
IPV6_DEFAULTGW=2a01:7c8:aabb::1
Don't see a DNS1, 2, 3, or something similar? Then check your nameserver configuration in /etc/resolv.conf and adjust it accordingly.
Adjust the values behind DNS1, DNS2 and DNS3 to change the IP addresses of the DNS resolvers. It is also possible to only set DNS1 and DNS2 and use the corresponding IPv4 or IPv6 addresses. Please note that each single IPv4 and / or IPv6 address has its own rule (DNS1, DNS2, etc).
Save the changes and close the file afterwards (ctrl + x > y > enter).
Step 5
Finally, reboot your VPS to process the changes (a network restart may not be enough for some services). After the reboot, you can review the current nameservers again using the command:
cat /etc/resolv.confChanging the DNS resolvers in Windows Server
The example below shows the steps in Windows Server 2019. They are almost identical for previous Windows Server versions.
If your server has the DNS server role installed, make sure to also change the DNS resolvers there, see the next paragraph 'Windows DNS Manager'.
Step 1
Connect to your Windows Server using Remote Desktop or the VPS-console.
Step 2
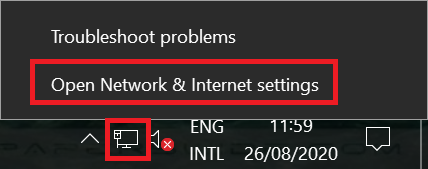
With the right mouse button, click the network icon in the lower right corner of your screen and click on 'Open Network & Internet Settings'.
Step 3
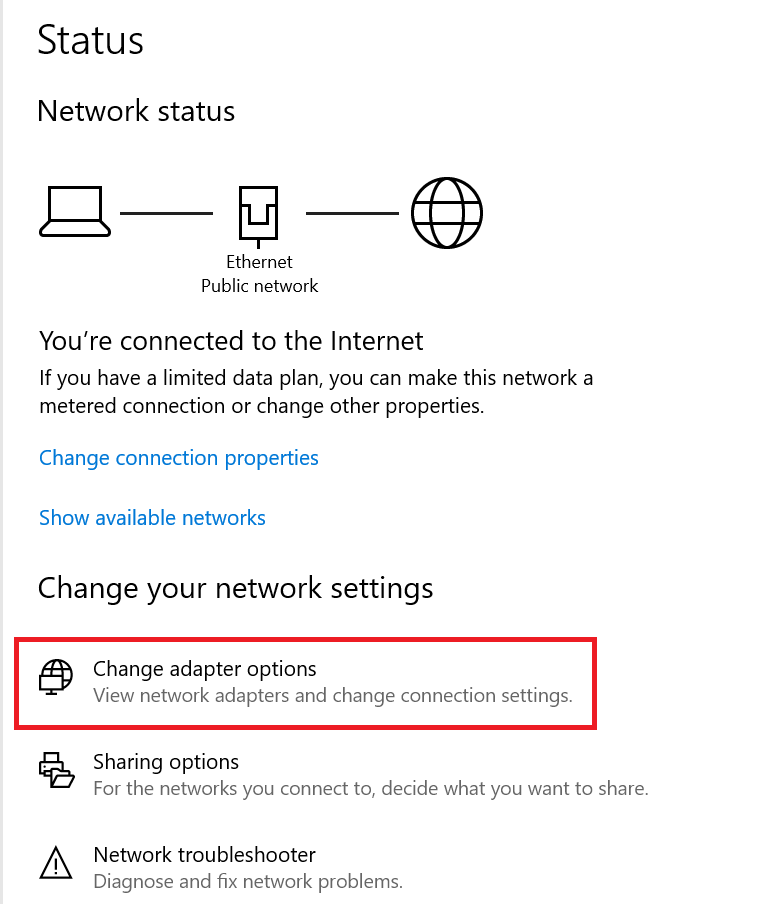
Click 'Change adapter options' in the Window that opens (in Windows Server 2012 this is called 'Change adapter settings').
Step 4
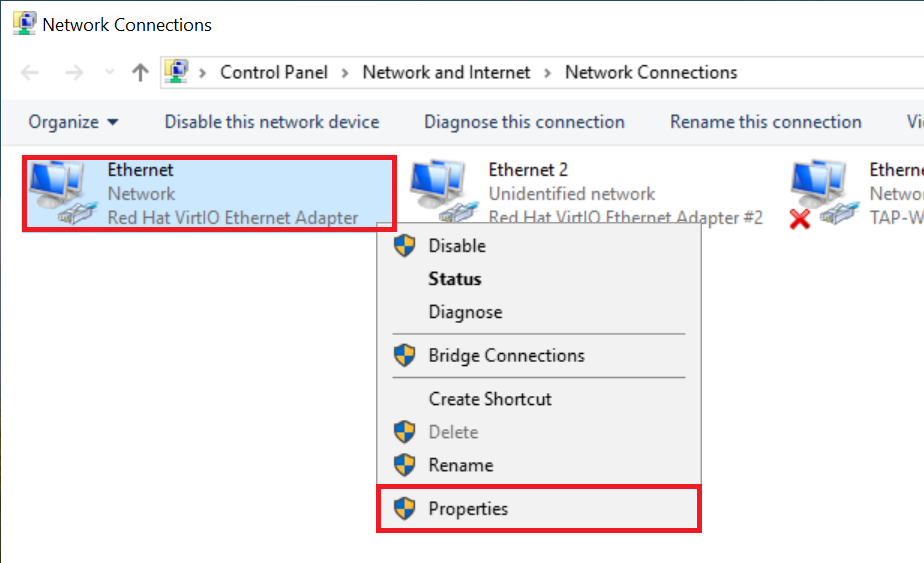
In the 'Network Connections' screen, click on your primary network adapter with the right mouse button and select 'Properties'.
Step 5
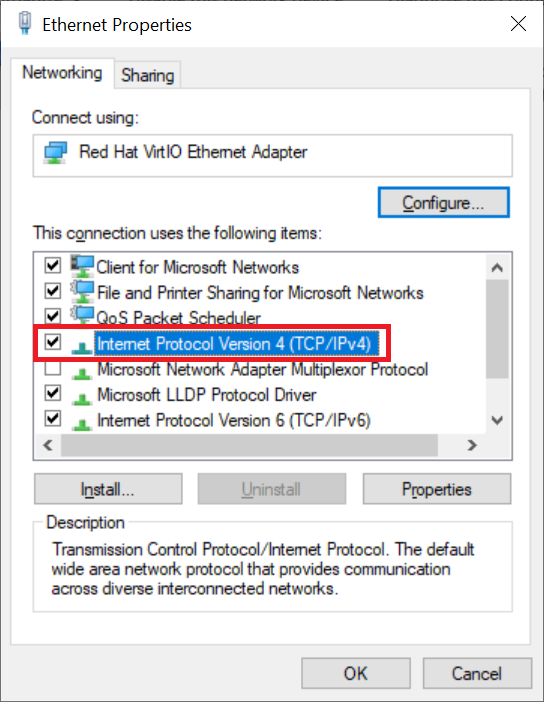
Double click on 'Internet Protocol Version 4 (TCP/IPv4)'.
Step 6
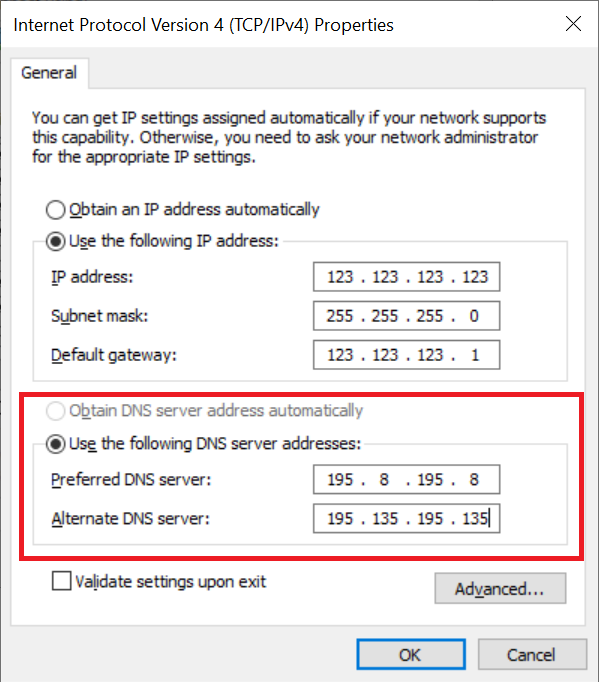
Under 'Use the following DNS server addresses', change the value to the IP addresses of the desired DNS resolvers and next click on the 'OK' button in all open screens to respectively save and close them.
Windows DNS Manager
If your VPS has the DNS role installed, the DNS Manager will manage your DNS-resolvers. It's well possible that your network adapter (see the previous paragraph) shows one set of DNS resolvers and the DNS Manager shows another. You can change these as follows:
Step 1
Connect to your Windows Server via Remote Desktop or de VPS-console.
Step 2
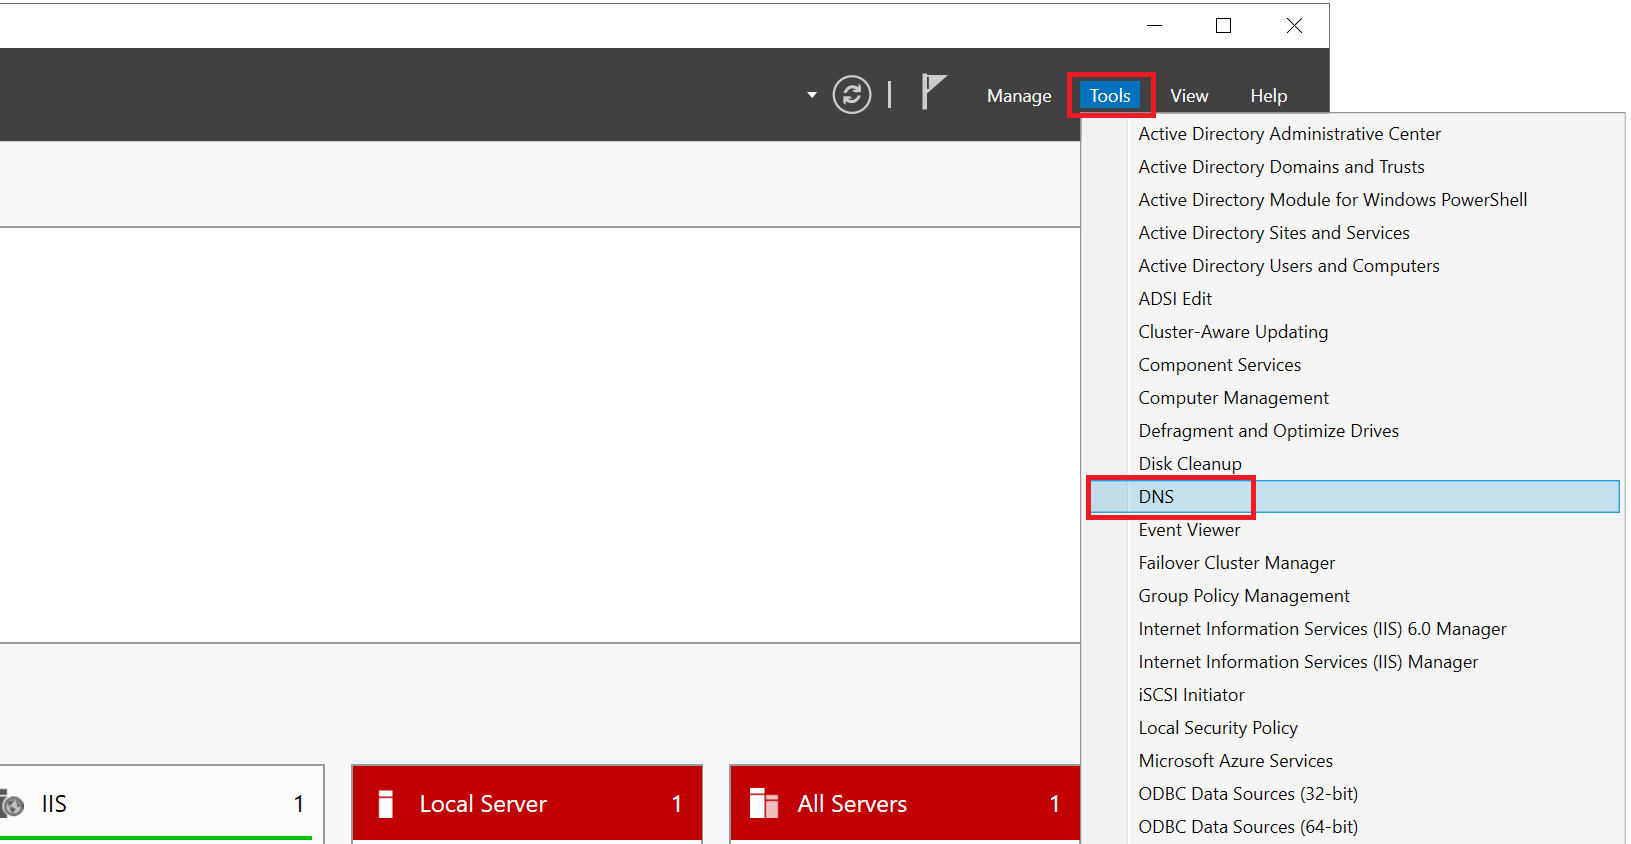
Open de Server Manager and in the top right click on 'Tools' > 'DNS'.
Step 3
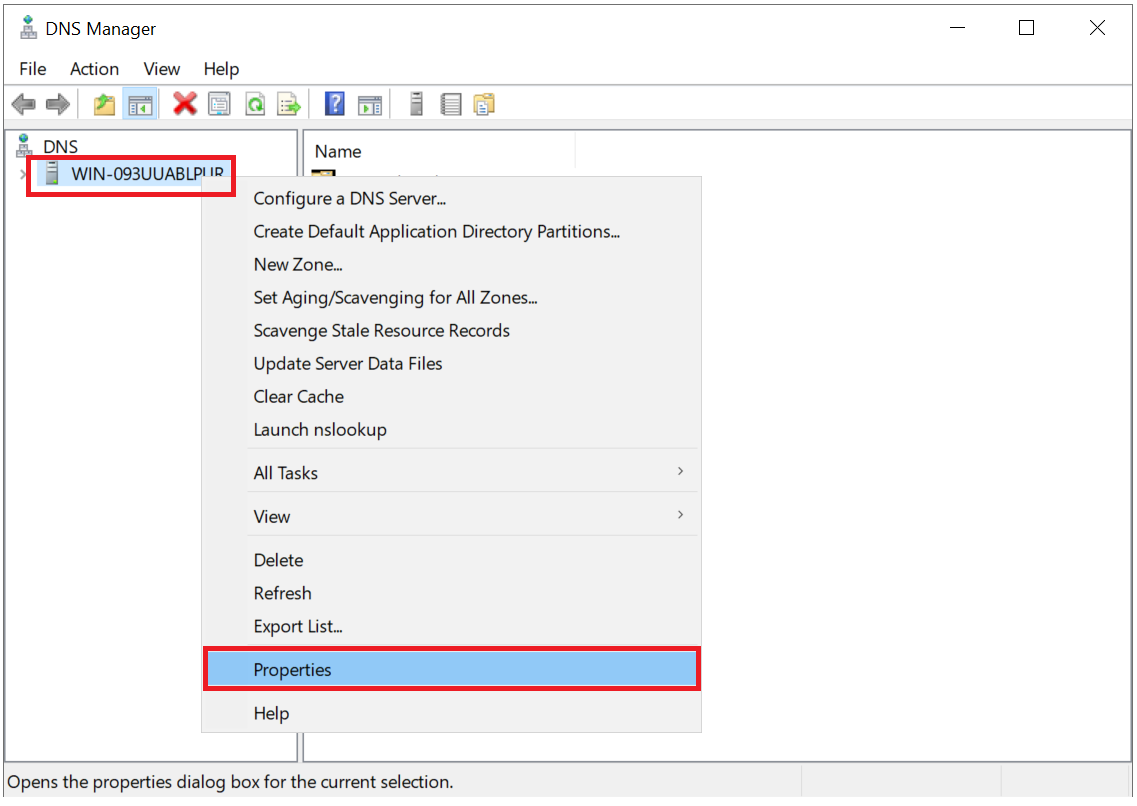
Click on the name of your server with the right mouse button and select 'Properties'.
Step 4
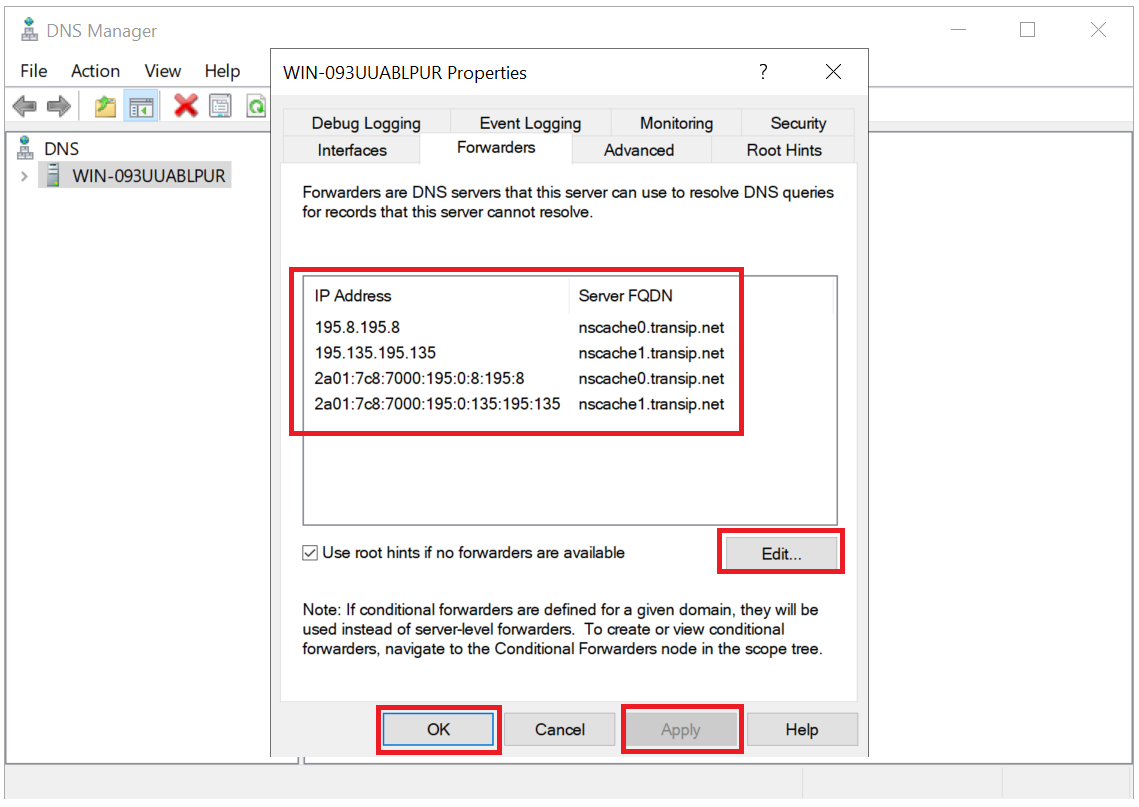
Selec the 'Forwarders' tab. Here you'll see your current DNS-resolvers which can be changed one by one by selecting them and clicking 'Edit'. Afterwards, click on 'Apply' and 'OK' to apply your changes.
cPanel
Do you use cPanel? You can then change your DNS resolver configuration directly from within WHM.
Step 1
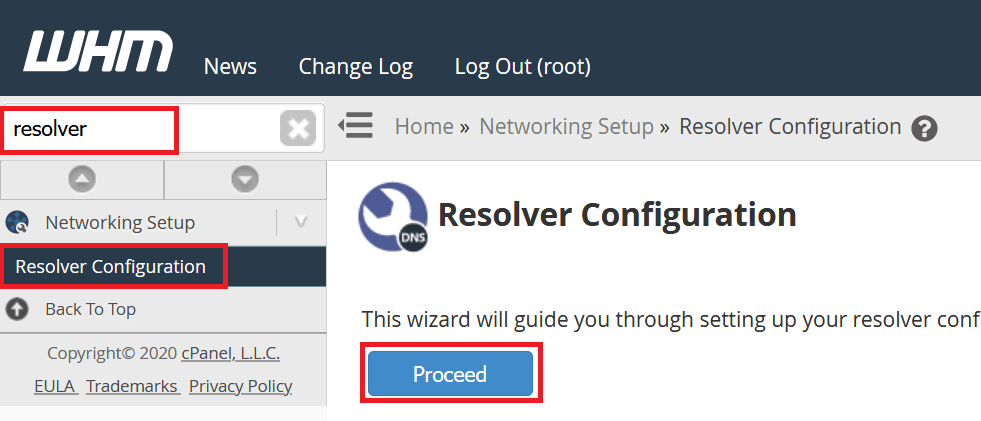
Log in to WHM (via port 2087) and search for 'Resolver'. In the results, click on 'Resolver Configuration' > 'Proceed'.
Step 2
Change the IP addresses to those of the desired DNS resolvers and click 'Continue'.

You will now receive a message that the changes were successful and have finished adjusting your DNS resolvers.
This concludes our tutorial on customizing the DNS resolvers of your VPS.
Should you have any questions regarding this article, do not hesitate to contact our support department. You can reach them via the 'Contact us' button at the bottom of this page.
Do you want to discuss this article with other users?Please leave a message under 'Comments'.


