


In this article, we explain how to 1) add a static IPv4 or IPv6 address and 2) how to add more than one IPv4 or IPv6 address to your Windows VPS. Click here for a manual on adding an IPv4 or IPv6 address to a Linux VPS.
Only static configurations allow for more than one IP address to be added. Steps 1 - 7 in the guides below show you how to staticly configure IP addresses. Step 8 and further shows how to add an additional IP address on top of that.
- This tutorial is about public IP addresses. In this tutorial, you will find more information about setting up internal addresses (for your private network).
- A VPS includes 1 IPv4 address by default, but you can expand this to a maximum of 20 IPv4 addresses via the control panel.
- In case a misconfiguration makes your VPS unreachable, it is best to create a snapshot first.
This article covers the following topics:
Adding an extra IPv4 or IPv6 address to your VPS:
- Ordering an extra IPv4 address in the control panel.
- Creating an extra IPv6 address in the control panel.
Configuring the extra IPv4 or IPv6 address on your VPS:
Windows Server 2019 / 2022:
Windows Server 2025:
Ordering an IPv4 address in the control panel
A VPS includes 1 IPv4 address by default, but you can expand this to a maximum of 10 IPv4 addresses via the control panel. A maximum limit of 20 IPv4 addresses applies to the VPSs of the PRO series or PerformanceVPSs.
Step 1
Log in to your control panel, navigate to the 'VPS' tab and click the name of your VPS on the left.
Step 2
In the top right, click on 'Manage', followed by 'Network information'.
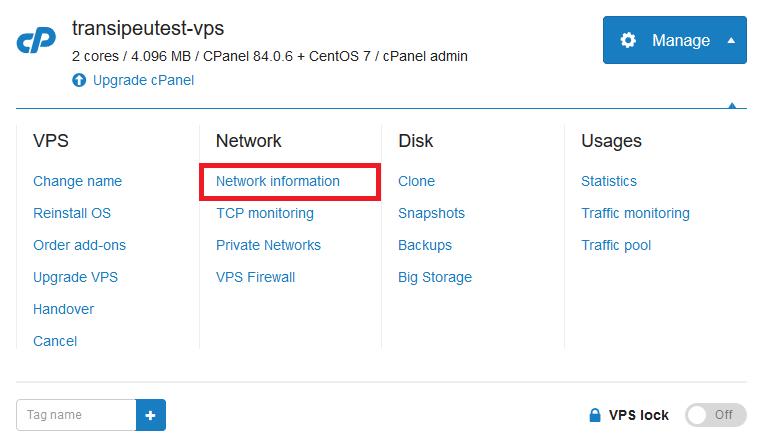
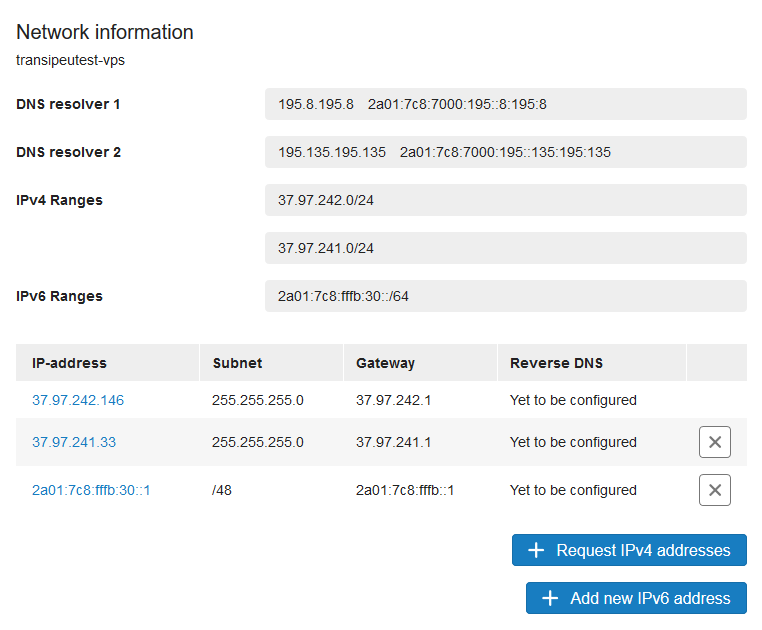
Step 3
Your shown an overview of your IP addresses. Click 'Request IPv4 addressess' to order additional IP addresses.
Adding an IPv6 address in the control panel
Each VPS has a /64 IPv6 range at its disposal by default, where IP addresses can be added as desired. A /64 IPv6 range contains a total of 18,446,744,073,709,551,616 IP addresses, so the likeliness that you will not have enough is quite small!
Step 1
Log in to your control panel, navigate to the 'VPS' tab and click the name of your VPS on the left.
Step 2
In the top right, click on 'Manage', followed by 'Network information'.
Step 3
Your shown an overview of your IP addresses. Click 'Request IPv4 addressess' to order additional IP addresses.
Step 4
Enter the desired IPv6 address and click 'Add IPv6 address'. Will you use this IP address to send e-mails from your VPS? Then also set your reverse DNS before adding the IPv6 address.
-
Step 1
Connect with the VPS using the VPS console or RDP and log in.
Step 2
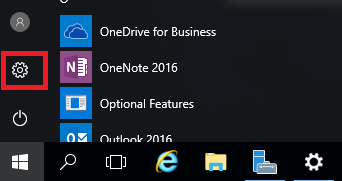
Click on start, followed by the settings icon to go to the control panel.
Step 3
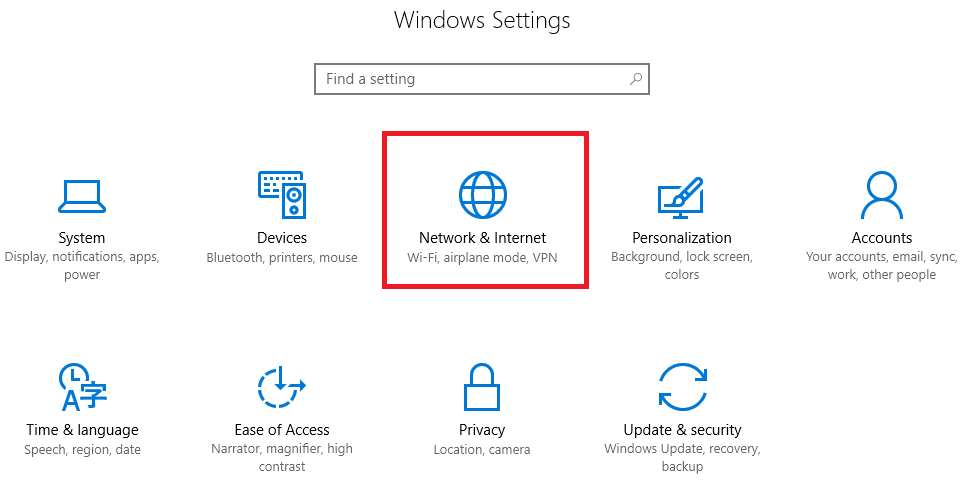
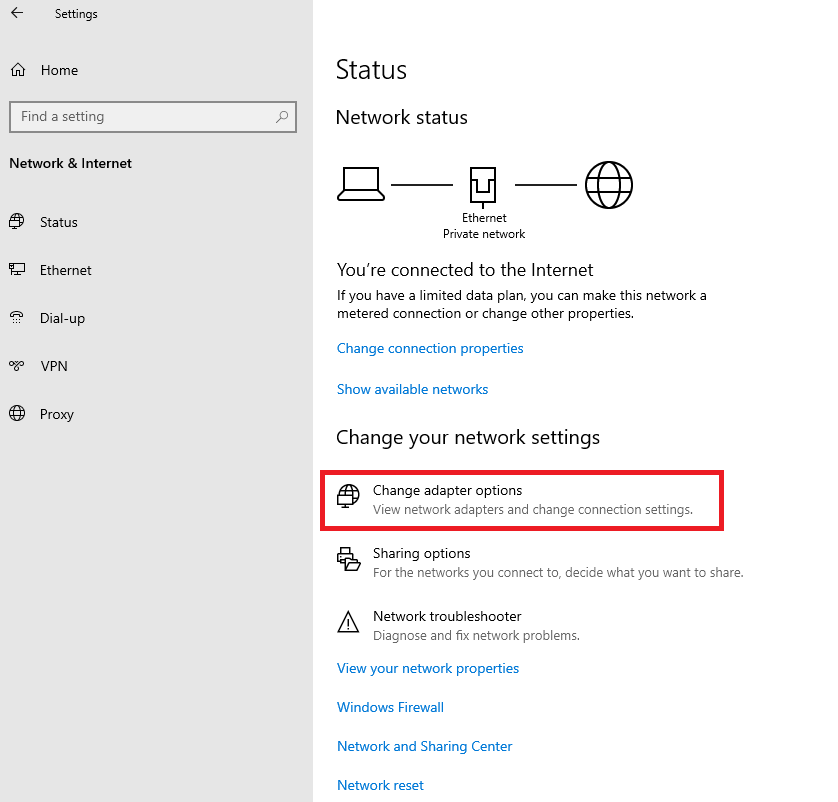
Click 'Network & Internet'.
Step 4
Next, click on 'Change adapter options'.
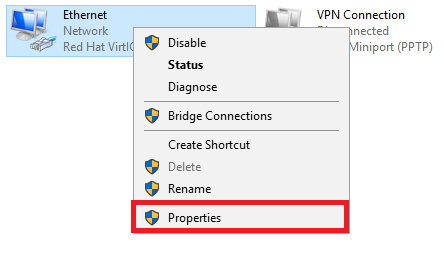
Step 5
Then right click 'Ethernet' and click 'Properties' in the pop-up window.
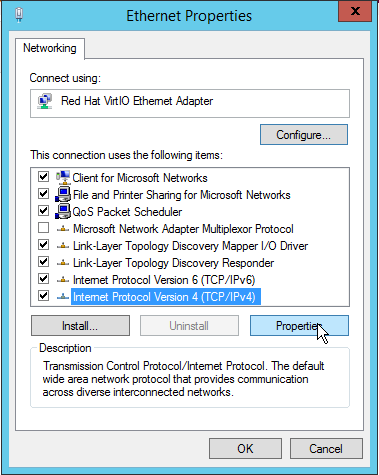
Step 6
In the overview that appears click 'Internet Protocol Version 4' and then click 'Properties' at the bottom right.
Step 7
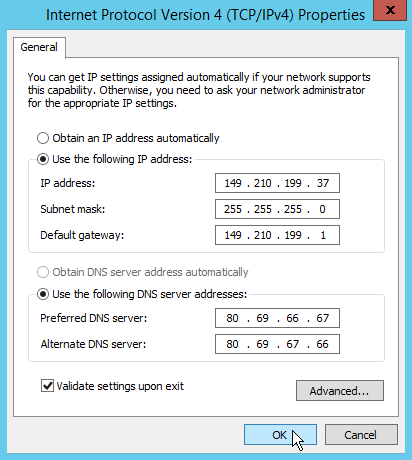
By default, DHCP is used, unless you have already modified it manually.
If it is not yet the case, set the option to 'Use the following IP address' and fill in the details of your IP address which you can find in the control panel under 'Manage' > 'Network Information'.
You'll need to manually configure the resolvers, which might already be done if, for example, you're using Google's resolvers (8.8.8.8). The TransIP resolvers can also be found in the control panel with the rest of the network information.
At this point you can already check 'Validate settings upon exit'. With this option selected, Windows Server will test your configuration when you save the settings.Are you only configuring a single static IP-address? Click 'Ok' twice to finish your configuration. Are you configuring additional IP addresses? Click 'Advanced' and proceed to the next step.
Step 8
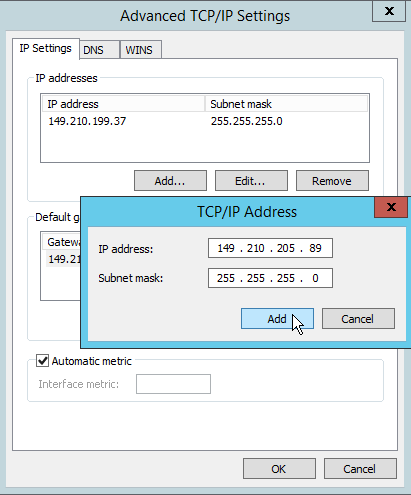
In the ‘Advanced TCP/IP Settings’ screen click 'Add ...' to add a new IP. Make sure you put the subnet mask on 255.255.255.0 to prevent that you cannot reach IPs in the same network.
Click 'Add' to add the IP.
Step 9
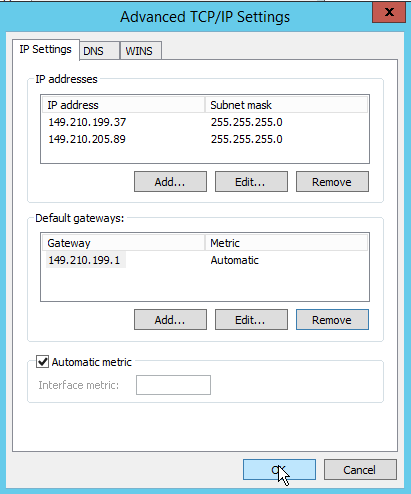
The extra IP address is now listed in the overview of IP addresses. If you want to add more IPs, repeat the above step.
Now click ‘Ok’ to save the changes.
Step 10
Click 'Ok' in the 'Internet Protocol Version 4 Properties' screen again and do not forget to turn on the ‘Validate settings upon exit’ option.
Windows will now test the configuration and the IP is added to the network interfaces.
-
Step 1
Connect with the VPS using the VPS console or RDP and log in.
Step 2
Click on start, followed by the settings icon to go to the control panel.
Step 3
Click 'Network & Internet'.
Step 4
Next, click on 'Change adapter options'.
Step 5
Then right click 'Ethernet' and click 'Properties' in the pop-up window.
Step 6
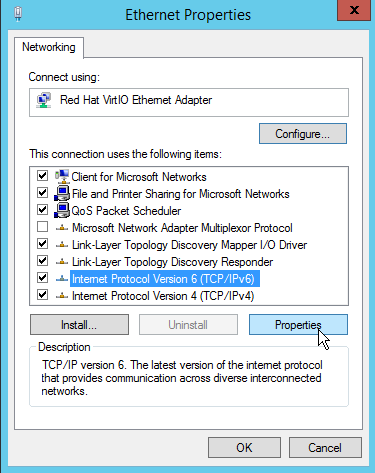
In the overview that appears click 'Internet Protocol Version 6' and click 'Properties' in the bottom right.
Step 7
By default, the first IPv6 address should have been added here, unless you have removed it manually.
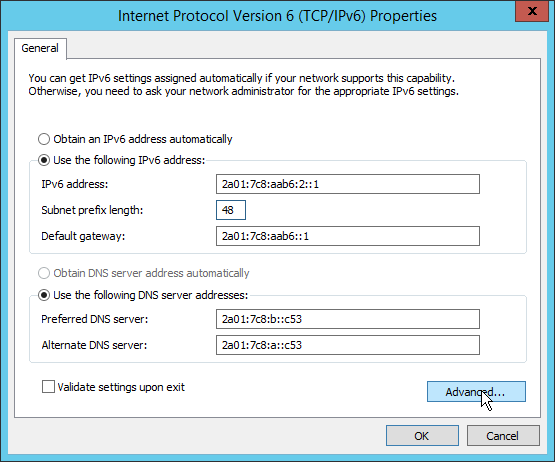
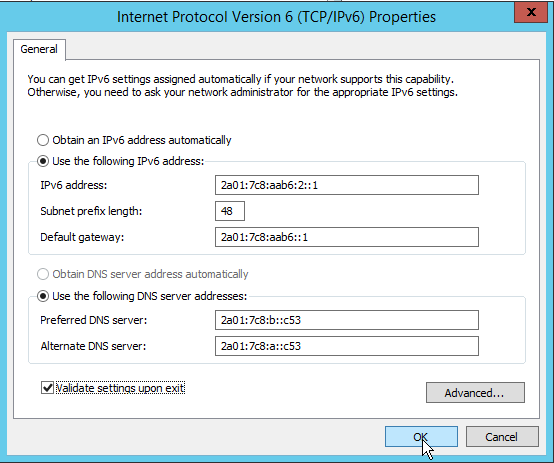
If it is not yet the case, set the option to 'Use the following IP address' and fill in the details of your IP address which you can find in the control panel under 'Manage' > 'Network Information'.
You'll need to manually configure the resolvers, which might already be done if, for example, you're using Google's resolvers (8.8.8.8). The TransIP resolvers can also be found in the control panel with the rest of the network information.
At this point you can already check 'Validate settings upon exit'. With this option selected, Windows Server will test your configuration when you save the settings.Are you only configuring a single static IP-address? Click 'Ok' twice to finish your configuration. Are you configuring additional IP addresses? Click 'Advanced' and proceed to the next step.
Step 8
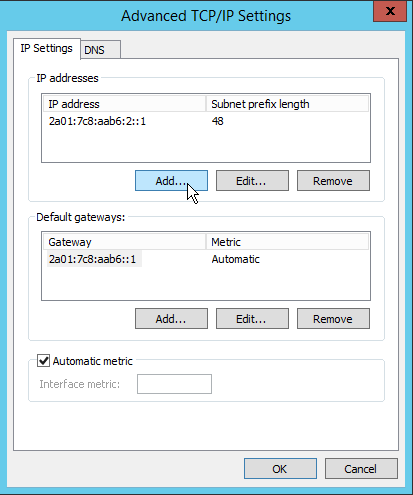
In the 'Advanced TCP / IP Settings' screen click 'Add ...' to add a new IP.
Step 9
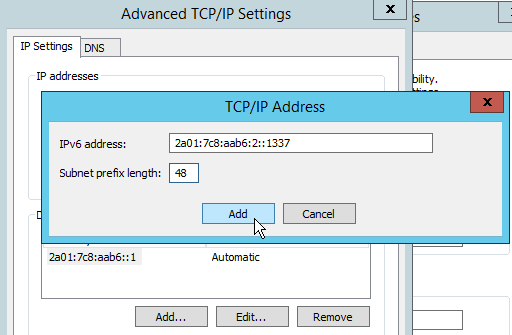
Add the extra IPv6 address here. Make sure you set subnet prefix length to 48 to prevent that you cannot reach IPs in the same network.
Click 'Add' to add the IP.
Step 10
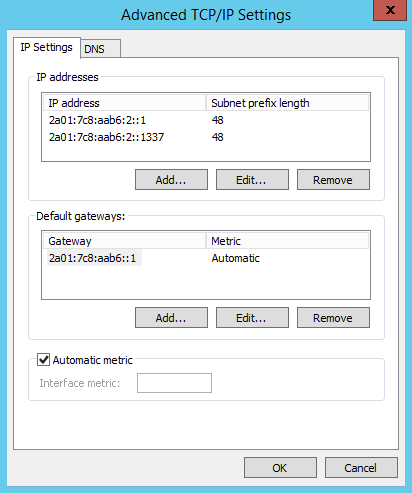
The extra IP address is now listed in the overview of IP addresses. If you want to add more IPs, repeat the above step.
Now click 'Ok' to save the changes.
Step 11
Now click 'Ok' again on the 'Internet Protocol Version 6 Properties' screen and do not forget to turn on the ‘Validate settings upon exit’ option.
Windows will now test the configuration and the IP is added to the network interfaces.
Adding a Static / Extra IPv4 Address in Windows Server 2025
Below we show the most convenient method to add IP addresses (statically). Alternatively, you can set a single IPv4 address statically via ‘Settings’ > ‘Network & internet’ > ‘Ethernet’.
Step 1
Establish a connection via the VPS console or via RDP with the VPS and log in as administrator.
Step 2
Click the Windows Start button and select ‘Server Manager’.

Step 3
In the left menu, click on ‘Local Server’ and then in the center click on ‘IPv4 address assigned by DHCP, IPv6 enabled’.

Step 4
For Windows veterans, the process from here will look familiar: it is identical to previous editions of Windows Server.
You now see an overview of your network adapters. Right-click on ‘Ethernet Instance 0’ and then click on ‘Properties’ (in this example, “Ethernet Instance 0 2” is a private network adapter).

Step 5
In the overview that appears, click on 'Internet Protocol Version 4' and then on 'Properties' in the lower right.

Step 6
By default, DHCP is enabled via the option ‘Obtain an IP address automatically’, but since this only works for the first IPv4 address, first set your primary IP statically and then add any extra IPv4 addresses.
- Check the option 'Use the following IP address'
- IP address, Subnet mask and default gateway: Enter the details of your IP address as found in the control panel under 'Manage' > 'Network Information'.
- Check the option ‘Use the following DNS server addresses’.
- Set the TransIP resolvers as your ‘Preferred DNS server’ and ‘Alternate DNS server’ which you can find in the control panel under 'Manage' > 'Network Information'.
- Check the option 'Validate settings upon exit' so that Windows Server tests the network configuration when you save the changes.
If you only want to set your primary IPv4 address statically, double-click 'Ok' (any Remote Desktop connection will now disconnect). You are then finished with this guide. If you wish to add extra IPv4 addresses, click on 'Advanced' and proceed to the next step.

Step 7
In the 'Advanced TCP/IP Settings' window, click on 'Add...' to add a new IPv4 address (which you can also find in the control panel under 'Manage' > ‘Network Information'). Make sure to set the subnet mask to 255.255.255.0. Click 'Add' to add the IPv4 address.

Step 8
The extra IPv4 address now appears in the list of IP addresses; if you want to add more IPv4 addresses, repeat the previous step.
Click on 'Ok' to save the changes.

Step 9
Finally, in the 'Internet Protocol Version 4 Properties' window, click on 'Ok' again and be sure to enable the 'Validate settings upon exit' option.
Windows will now test the configuration and the IP address will be added to the network interfaces.
Adding a Static / Extra IPv6 Address in Windows Server 2025
Below we show the most convenient method to add IP addresses (statically). Alternatively, you can set a single IPv6 address statically via ‘Settings’ > ‘Network & internet’ > ‘Ethernet’.
Step 1
Establish a connection via the VPS console or via RDP with the VPS and log in as administrator.
Step 2
Click the Windows Start button and select ‘Server Manager’.
Step 3
In the left menu, click on ‘Local Server’ and then in the center click on ‘IPv4 address assigned by DHCP, IPv6 enabled’.
Step 4
For Windows veterans, it will look familiar from here: the process is identical to previous editions of Windows Server:
You now see an overview of your network adapters. Right-click on ‘Ethernet Instance 0’ and then click ‘Properties’ (in this example, “Ethernet Instance 0 2” is a private network adapter).
Step 5
In the overview that appears, click on ‘Internet Protocol Version 6’ and then on ‘Properties’ on the right.

Step 6
By default, DHCP is enabled via the option ‘Obtain an IP address automatically’, but since this only works for the first IPv6 address, first set your primary IP statically and then add any extra IPv6 addresses.
- Check the option 'Use the following IP address'
- IP address, Subnet mask and default gateway: Enter the details of your IP address as found in the control panel under 'Manage' > 'Network Information'.
- Check the option ‘Use the following DNS server addresses’
- Set the TransIP resolvers as your ‘Preferred DNS server’ and ‘Alternate DNS server’ as found in the control panel under 'Manage' > 'Network Information'.
- Check the option 'Validate settings upon exit' so that Windows Server tests the network configuration when you save the changes.
If you only want to set your primary IPv6 address statically, double-click ‘Ok’ (any Remote Desktop connection will now disconnect). You are then finished with this guide. If you wish to add extra IPv6 addresses, click on ‘Advanced’ and proceed to the next step.

Step 7
In the 'Advanced TCP/IP Settings' window, click on ‘Add...’ to add a new IPv6 address (which you can also find in the control panel under 'Manage' > ‘Network Information'). Make sure to set the subnet prefix length to 48. Click ‘Add’ to add the IPv6 address.

Step 8
The extra IPv6 address now appears in the list of IP addresses; if you want to add more IPv6 addresses, repeat the previous step.
Now click ‘Ok’ to save the changes.

Step 9
Finally, in the 'Internet Protocol Version 6 Properties' window, click ‘Ok’ again and don’t forget to enable the ‘Validate settings upon exit’ option.
Windows will now test the configuration and the IP address will be added to the network interfaces.
Should you have any questions left regarding this article, do not hesitate to contact our support department. You can reach them via the ‘Contact Us’ button at the bottom of this page.