


When you order an additional IPv4 address or add an extra IPv6 address to your IP addresses via the control panel, these are not automatically added to your VPS via DHCP. You also need to manually add extra IP addresses to the network interfaces.
In this article, we explain how to add or statically configure an IPv4 and IPv6 address to your CentOS Stream 9, AlmaLinux 9, or Rocky Linux 9 VPS. For this, you need an extra IPv4 and/or IPv6 address. If you do not have them yet, first consult one of the following articles:
- Order an additional IPv4 address in the control panel
- Create an additional IPv6 address in the control panel
See this article for an overview of all our guides on adding an extra or static IPv4 and IPv6 address to various Linux distros, or here for Windows.
- This tutorial is about public IP addresses. In this guide you can find more information about setting up internal addresses for your private network.
-
Note: your VPS may have a different network adapter name than eth0. You can check this with the command ip a.
- A VPS includes one IPv4 address by default, but you can expand this to a maximum of 20 IPv4 addresses.
- Each VPS has a /64 IPv6 range available by default, from which IP addresses can be added as desired. A /64 IPv6 range contains a total of 18,446,744,073,709,551,616 IP addresses, so the chances are quite small that you won't have enough! The gateway falls outside this range, so you always set the netmask to 48.
Adding an IPv4 address in CentOS Stream 9, AlmaLinux 9, or RockyLinux 9
Step 1
Connect to your VPS via the VPS console or via SSH.
Step 2
Once logged in, you can see the current network interfaces and the configured IPs with the command:
ip aFor the following steps, it is especially important that you are aware of the correct adapter name. In this example, it is eth0.
1: lo: <LOOPBACK,UP,LOWER_UP> mtu 65536 qdisc noqueue state UNKNOWN group default qlen 1000
    link/loopback 00:00:00:00:00:00 brd 00:00:00:00:00:00
    inet 127.0.0.1/8 scope host lo
        valid_lft forever preferred_lft forever
    inet6 ::1/128 scope host
        valid_lft forever preferred_lft forever
2: eth0: <BROADCAST,MULTICAST,UP,LOWER_UP> mtu 1500 qdisc pfifo_fast state UP group default qlen 1000
    link/ether 52:54:00:f6:ae:54 brd ff:ff:ff:ff:ff:ff
    inet 149.210.111.222/24 brd 149.210.111.255 scope global noprefixroute eth0
        valid_lft forever preferred_lft forever
    inet6 2a01:7c8:aabb:111::1/48 scope global noprefixroute
        valid_lft forever preferred_lft forever
    inet6 fe80::5054:ff:fef6:ae54/64 scope link noprefixroute
        valid_lft forever preferred_lft forever
Step 3
Note: If you are using the fast installs feature for VPS and chose installation via SSH keys, one-time password, or cloud-config user data, disable the underlying CloudInit and optionally remove the existing configuration:
sudo touch /etc/cloud/cloud-init.disabled
sudo rm /etc/sysconfig/network-scripts/ifcfg-eth0
Step 4
There are two options to proceed from this point: running the configuration through a graphical interface (GUI) or via command line. If you've cloned a VPS or restored a snapshot to another VPS, we recommend manual configuration.
Manual configuration
Step 1
Open the network configuration. It can usually be found in /etc/sysconfig/network-scripts/ (adjust eth0 to the name of the adapter you found in step 2).
sudo nano /etc/sysconfig/network-scripts/ifcfg-eth0
Step 2
Adjust the configuration as shown below, replacing the IP addresses with those belonging to your VPS.
AUTOCONNECT_PRIORITY=120
BOOTPROTO=none
DEVICE=eth0
ONBOOT=yes
TYPE=ethernet
IPV4_FAILURE_FATAL=no
IPADDR=149.210.111.222
IPADDR1=149.210.222.111
NETMASK=255.255.255.0
NETMASK1=255.255.255.0
PREFIX=24
PREFIX1=24
GATEWAY=149.210.111.1
GATEWAY1=149.210.222.1- IPADDR(x) is the IP address you'd like to configure and GATEWAY(x) the gateway, which can be found in the TransIP control panel.
- For each IP address, add an incremental number, e.g. IPADDR, IPADDR1, IPADDR2, IPADDR3, etc. The same applies to the GATEWAY if applicable. Leave the (sub)NETMASK on 255.255.255.0.
- It is not necessary to add another gateway if the additional IP address is in the same /24 IP range.
Save the changes and close nano (ctrl + x > y > enter).
Step 3
Restart the NetworkManager to process the changes and use the new IP configuration:
sudo systemctl restart NetworkManagerConfiguration through a GUI
Step 1
CentOS 9, AlmaLinux 9, and Rocky Linux 9 use a 'keyfile' system instead of the NetworkManager configuration files you may be familiar with. You manage these in a different way, namely via a graphical command-line tool called 'nmtui'. Start it with the command:
sudo nmtui
Step 2
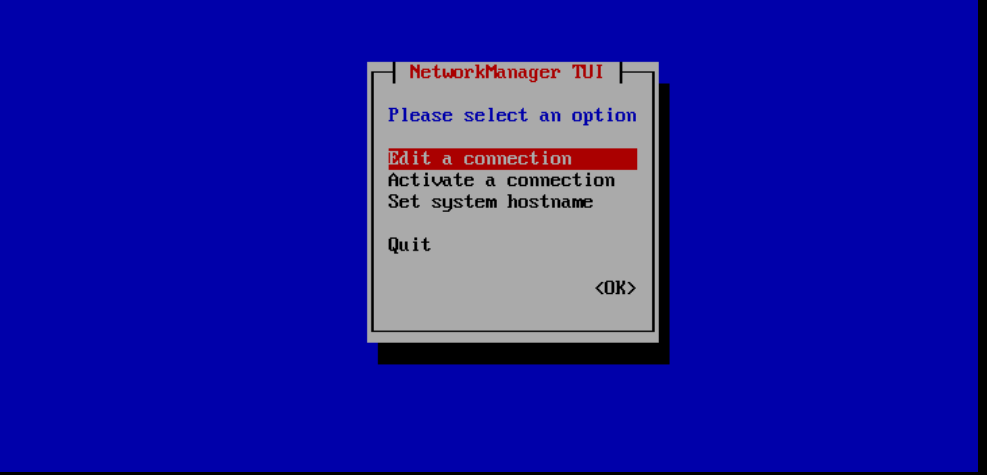
You will see the menu below. The option 'Edit a connection' is selected by default. Press 'Enter' to continue.

Step 3
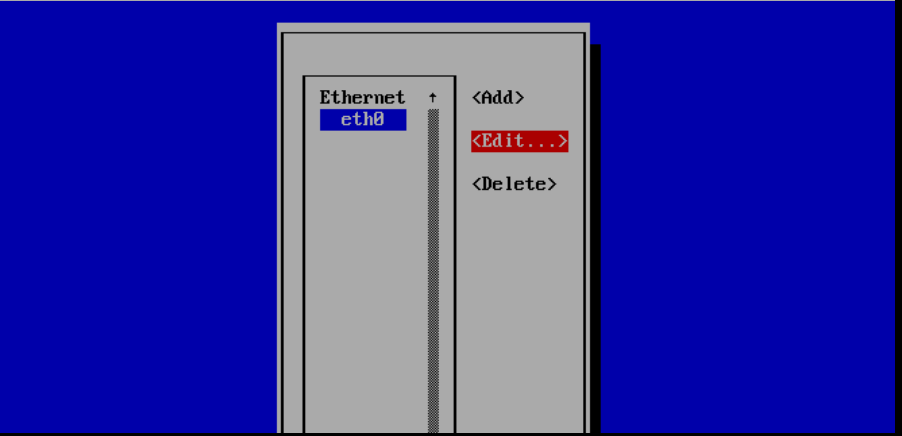
Then select the name of the adapter from step 2 (you usually see only one adapter here), use the arrow keys to select 'Edit' and press 'Enter'.
Step 4
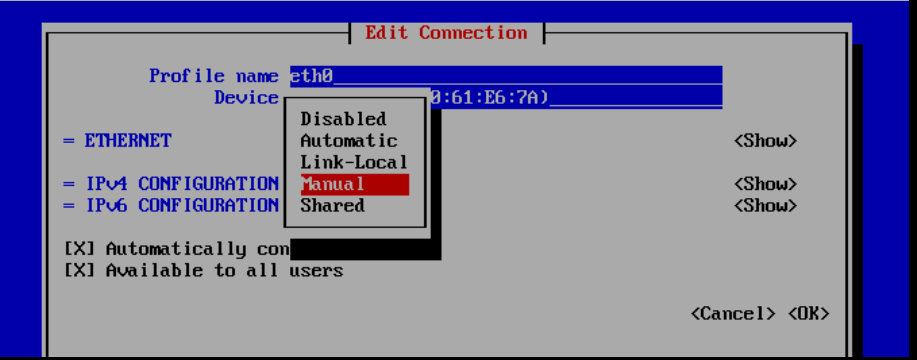
Select 'IPv4 CONFIGURATION' and choose 'Automatic'. Press 'Enter', then select 'Manual' and press 'Enter' again.
Now select 'Show' with the arrow keys and press 'Enter'. Adjust the configuration as in the example below with the following modifications:
- Replace 136.144.131.92/24 with the primary IPv4 address of your VPS. Don't forget to add the subnet /24.
- Want to add more IP addresses? Select 'Add' and add the other IP addresses.
- Set the Gateway to the IPv4 gateway address of your primary IPv4 address. You can find this in the control panel under 'Manage' > 'Network Information'.
- Set the DNS servers to the available IPv4 addresses of the DNS servers, which you can also find in your control panel under 'Network Information'.
- Don't forget to check the options 'Ignore automatically obtained routes' and 'Ignore automatically obtained DNS parameters'.
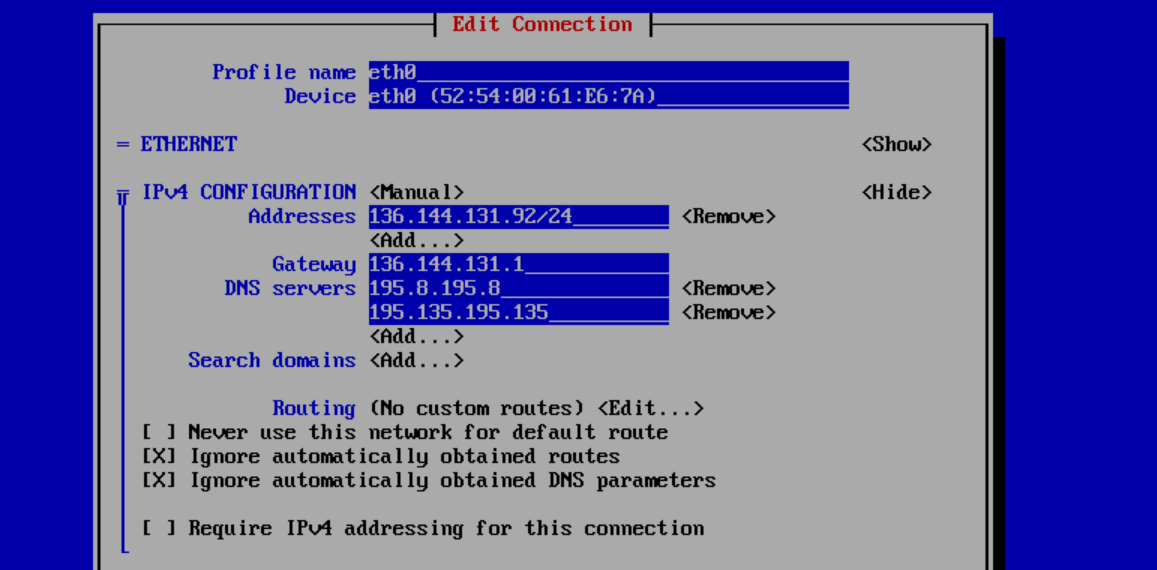
Finally, select the 'OK' option at the bottom and press 'Enter' to process the changes.
Step 5
You will return to the screen from step 5. Press 'Esc' to go back one screen, select 'Quit' and press 'Enter' to exit nmtui.

Step 6
Finally, process the changes with the command:
sudo nmcli networking off && sudo nmcli networking on
Adding an IPv6 address in CentOS Stream 9, AlmaLinux 9, or Rocky Linux 9
Step 1
Connect to your VPS via the VPS console or via SSH.
Step 2
Once logged in, you can see the current network interfaces and the configured IPs with the command:
ip aFor the following steps, it is especially important that you are aware of the correct adapter name. In this example, it is eth0.
1: lo: <LOOPBACK,UP,LOWER_UP> mtu 65536 qdisc noqueue state UNKNOWN group default qlen 1000
    link/loopback 00:00:00:00:00:00 brd 00:00:00:00:00:00
    inet 127.0.0.1/8 scope host lo
        valid_lft forever preferred_lft forever
    inet6 ::1/128 scope host
        valid_lft forever preferred_lft forever
2: eth0: <BROADCAST,MULTICAST,UP,LOWER_UP> mtu 1500 qdisc pfifo_fast state UP group default qlen 1000
    link/ether 52:54:00:f6:ae:54 brd ff:ff:ff:ff:ff:ff
    inet 149.210.111.222/24 brd 149.210.111.255 scope global noprefixroute eth0
        valid_lft forever preferred_lft forever
    inet6 2a01:7c8:aabb:111::1/48 scope global noprefixroute
        valid_lft forever preferred_lft forever
    inet6 fe80::5054:ff:fef6:ae54/64 scope link noprefixroute
        valid_lft forever preferred_lft forever
Step 3

Note: If you are using the fast installs feature for VPS and chose installation via SSH keys, one-time password, or cloud-config user data, disable the underlying CloudInit and optionally remove the existing configuration:
sudo touch /etc/cloud/cloud-init.disabled
sudo rm /etc/sysconfig/network-scripts/ifcfg-eth0
Step 4
There are two options to proceed from this point: running the configuration through a graphical interface (GUI) or via command line. If you've cloned a VPS or restored a snapshot to another VPS, we recommend manual configuration.
Manual configuration
Step 1
Open the network configuration. It can usually be found in /etc/sysconfig/network-scripts/ (adjust eth0 to the name of the adapter you found in step 2).
sudo nano /etc/sysconfig/network-scripts/ifcfg-eth0
Step 2
Adjust the configuration as shown below, replacing the IP addresses with those belonging to your VPS.
IPV6INIT=yes
IPV6_AUTOCONF=no
IPV6ADDR=2a01:7c8:aabb:111::1
IPV6_DEFAULTGW=2a01:7c8:aabb::1
IPV6_DEFROUTE=yes
IPV6_FAILURE_FATAL=no
Save the changes and close nano (ctrl + x > y > enter). Should you likee to add more IPv6 adresses, add the following line (placing all additional adresses between the quotes):
IPV6ADDR_SECONDARIES="2a01:7c8:aabb:111::2 2a01:7c8:aab:111::3"
Step 3
Restart the NetworkManager to process the changes and use the new IP configuration:
sudo systemctl restart NetworkManagerConfiguration through a GUI
Step 1
CentOS 9, AlmaLinux 9, and Rocky Linux 9 use a 'keyfile' system instead of the NetworkManager configuration files you may be familiar with. You manage these in a different way, namely via a graphical command-line tool called 'nmtui'. Start it with the command:
sudo nmtui
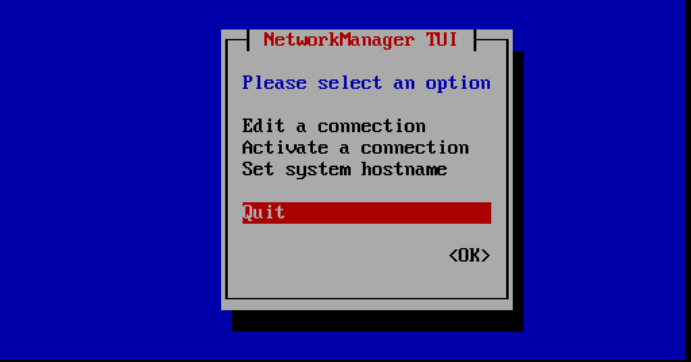
Step 2
You will see the menu below. The option 'Edit a connection' is selected by default. Press 'Enter' to continue.
Step 5
Then select the name of the adapter from step 2 (you usually see only one adapter here), use the arrow keys to select 'Edit' and press 'Enter'.

Step 6
Select 'IPv6 CONFIGURATION' and choose 'Automatic'. Press 'Enter', then select 'Manual' and press 'Enter' again.

Now select 'Show' with the arrow keys and press 'Enter'. Adjust the configuration as in the example below with the following modifications:
- Replace 2a01:7c8:fff9:34c::/48 with the primary IPv6 address of your VPS. Don't forget to add the subnet /48.
- Want to add more IP addresses? Select 'Add' and add the other IP addresses.
- Set the Gateway to the IPv6 gateway address of your primary IPv6 address. You can find this in the control panel under 'Manage' > 'Network Information'.
- Set the DNS servers to the available IPv6 addresses of the DNS servers, which you can also find in your control panel under 'Network Information'.
- Don't forget to check the options 'Ignore automatically obtained routes' and 'Ignore automatically obtained DNS parameters'.
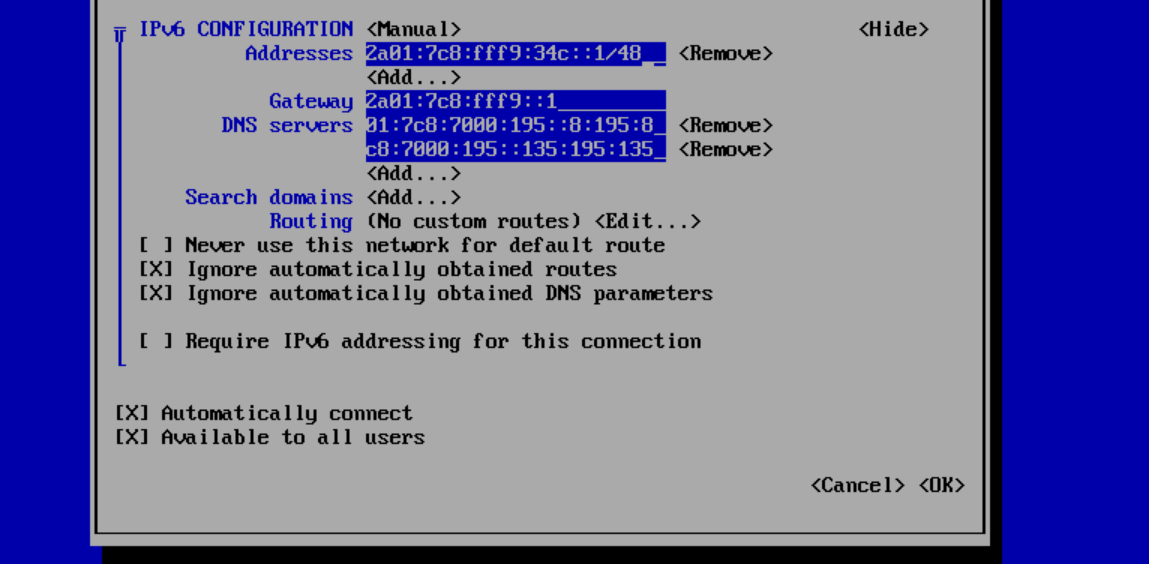
Finally, select the 'OK' option at the bottom and press 'Enter' to process the changes.
Step 7
You will return to the screen from step 5. Press 'Esc' to go back one screen, select 'Quit' and press 'Enter' to exit nmtui.
Step 8
Finally, process the changes with the command:
sudo nmcli networking off && sudo nmcli networking on
This concludes our tutorial on adding (static) IPv4 and IPv6 addresses to AlmaLinux 9, Rocky Linux 9 and CentOS Stream 9.