In this article, we will explain how to place a contact form on your WordPress website, so that visitors can contact you directly. We assume that you have a web hosting package and have installed WordPress on it.
If this is not yet the case, use this article to place a web hosting package with WordPress on your domain.
The use of a contact form
It is also possible to simply place an email address on your WordPress website. Unfortunately, these email addresses are often picked up by so-called spam bots. They search the web to send spam to the mailto: email addresses. Your inbox will then be full of spam in no time.
A contact form ensures that you stop almost all spam, but also offers other advantages. For example, when sending a standard e-mail, website visitors will not immediately send all the necessary information. With the help of a contact form, you can easily indicate which information you wish to receive from your visitors.
In addition, it is a good opportunity to thank the visitor for contacting you immediately after completing the contact form and you can indicate how long it will take before a response can be expected.
Install a contact form plugin
For this article we use the plug-in 'Contact Form 7'. This is a free and user-friendly contact form that you can get started with right away.
Step 1
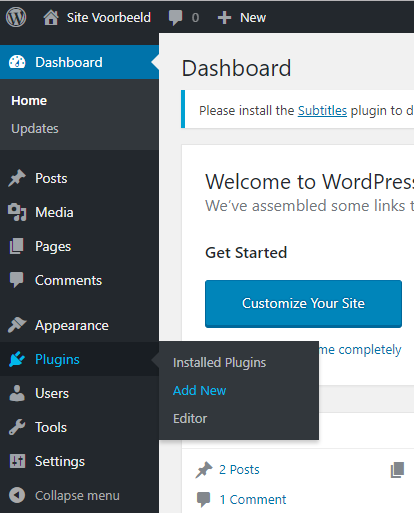
Log into your WordPress website dashboard and click on 'Plugins‘ from the left-hand menu, followed by ’Add New'.

Step 2
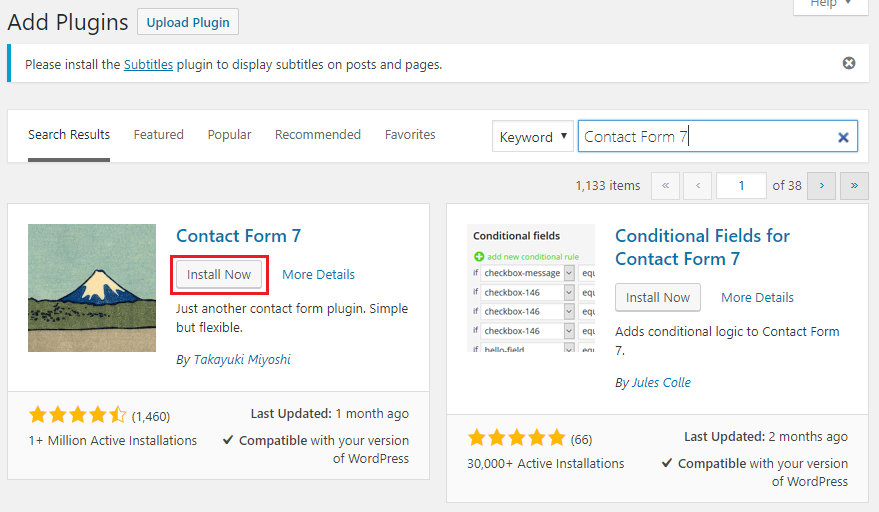
On the next page you will see an overview of available plugins. In the search bar on the right side you now enter 'Contact Form 7‘. Then click under the plugin on ’Install Now'.

Once the plugin is installed, you will see an 'Activate' button. Click on it to activate the plugin on your WordPress site immediately.
Create a contact form
Step 1
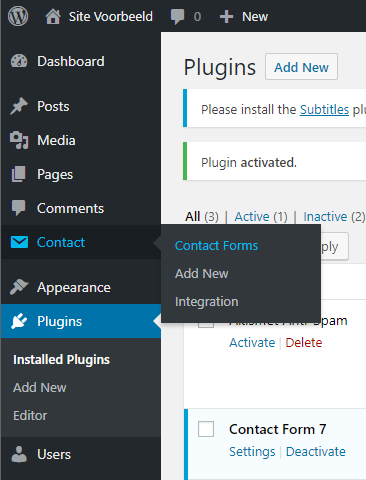
Now that the 'Contact Form 7‘ plugin is activated, you will find the ’Contact‘ button in the menu on the left side of the WordPress Dashboard. Click on this, followed by ’Contact Forms'.

Step 2
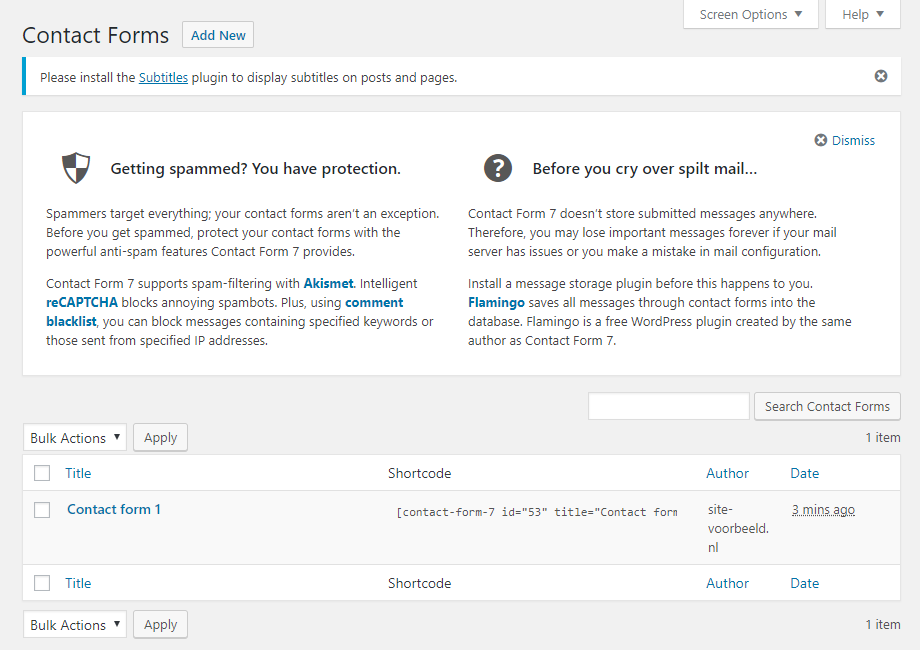
You will now be taken to the plugin overview, with more information about the plugin and the ability to manage your existing contact forms. You will see that there is already a standard form ready for you called 'Contact form 1‘. If you click on this, the contact form will open. In this standard form, the basic functions of the contact form are already displayed. If you want to start with a fresh contact form, click on ’Contact‘ again and then on ’Add New'.

Step 3
Now click on the default contact form called 'Contact form 1'. On this page you can give the contact form a different name. This name will not be shown on the website, but is purely a label for yourself to quickly recognize your contact forms within the WordPress Dashboard.

Under the label of your contact form you will see a shortcode . Paste this on one of your pages or in a text widget to make the contact form visible there.
Below the shortcode you will see the contact form with four tabs: Form, Mail, Messages and Additional Settings.
Form
Under the tab 'Form' you will find the content of the contact form itself. A standard layout in English has already been filled in for you. The content of the form works on the basis of so-called tags, which you will find just above the text field. An extensive explanation of the use of these tags can be found on the website of Contact Form 7.

Here you see a text field with different labels in it. These labels are delimited by <label> and </label>. What is visible within a label is equal to a field in the contact form.
In this case we have four fields, where the visitor must at least fill in his name, email address and the subject (shown by the asterisk * in the tags). The other field is for the content of the message. Below that you will find the label of the button to finally send the message. As shown in the example above, the fields can be adjusted to your liking.
If you have added the shortcode to, for example, the 'Contact' page, it will look like this:

Tip: Protect your contact form against spam right away by adding a reCAPTCHA within Contact Form 7.
You can do this by going to 'Contact' -> 'Integration' in the WordPress dashboard. Then click on 'Setup Integration' below reCAPTCHA, here you can fill in your reCAPTCHA Site Key and Secret Key . You get these by creating a reCAPTCHA at Google (use the Admin console on this page).
Mail
Under the 'Mail' tab you will find the layout of the email you receive after a visitor has completed and sent the contact form.
- At To, enter the email address where you want to receive the email.
- The From tag is filled in by default with [your-name], which ensures that the visitor's name is displayed in the email. In addition, the email address 'wordpress@domainname.extension' is filled in. This is the email address that will send the message from your website to the email address specified in 'To'. Here you can replace 'wordpress' with another email address if desired. It is essential that it ends with the same domain name as that of your website.
- Subject allows you to specify the subject of the email you receive. The [your-subject] tag ensures that the visitor's specified subject is displayed in the email.
- Additional Headers allow you to use extra headers to add a Cc or Bcc for example. The tag [your-email] ensures that when you reply to the received email, the visitor's email address is used.
- Message Body shows the message sent from the contact form. You can customize this to your liking, but we recommend to keep using the tags that are already present there.

Messages
Under the 'Messages' tab you specify the messages that are shown when the contact form is filled out. This way you can indicate what the visitor sees when the message is sent successfully, but also what action the visitor should perform if information is not filled in correctly.

Additional Settings
Under the tab 'Additional Settings' you specify additional settings. You can read which options there are on the website of Contact Form 7.

When you are happy with the content of your contact form, click 'Save' at the bottom or on the right side of the page to save the changes. Then use the shortcode on one of your pages to place the contact form there.
If you would like to know more about using 'Contact Form 7', please use the 'FAQ', 'docs' and 'Support forums' buttons in the Contact Forms overview on the right.
Troubleshooting
- Is your contact form not sending email? First check the DNS settings and make sure the From address is set correctly. You can find more information about this in the article 'My website is not sending email'.
- Incorrectly set ReCaptcha keys can also cause your contact form to not function. You can remove these in the ReCaptcha settings of your contact form to test and rule out whether this is causing the problem.
- Incorrect settings in an SMTP plugin can also affect other contact form plugins. Therefore, it is important to check the settings of that plugin as well or disable it temporarily.
In this article we explained how to set up a contact form on your WordPress website at TransIP using Contact Form 7.


